
-
Table of Contents – innovative techniques
- creative techniques
- Creative Techniques for Stabilizing Your Camera Without a Tripod
- Utilizing Natural Elements for Support in Landscape Photography
- Mastering Handheld Shooting: Tips for Sharp Images
- The Importance of Composition When Tripod Support is Lacking
- Leveraging Low Light Conditions for Stunning Landscape Shots
- Post-Processing Techniques to Enhance Handheld Landscape Photos
- Essential Gear Alternatives to Tripods for Landscape Photography
- Q&A
- Conclusion
This article on Landscape photography without tripod also touches on related topics like alternative methods, innovative techniques, essential gear, creative techniques.
“Mastering the Art of Steady Shots: Breathtaking Landscapes Without a Tripod!” Alternative methods is a foundational topic here. Essential gear is equally relevant.
Capturing breathtaking landscape shots can be a rewarding experience, but it can quickly become challenging when your tripod fails. Whether it’s a broken leg, a missing part, or simply an unexpected malfunction, the absence of a tripod can hinder your ability to achieve stability and precision in your photography. However, with a few creative techniques and a keen eye for composition, you can still produce stunning images. This guide will explore alternative methods for stabilizing your camera, utilizing natural elements in your environment, and employing innovative shooting techniques to ensure that your landscape photography remains captivating, even in the face of equipment challenges.
Creative Techniques for Stabilizing Your Camera Without a Tripod
When embarking on a photography adventure, the thrill of capturing breathtaking landscape shots often comes hand in hand with the unexpected challenges that nature presents. One such challenge can be the failure of your tripod, leaving you in a precarious situation where stability is paramount for achieving that perfect shot. However, the absence of a tripod does not spell disaster; instead, it opens the door to creative techniques that can help you stabilize your camera and still capture stunning images.
To begin with, consider utilizing your surroundings. Nature is full of potential stabilizing elements, such as trees, rocks, or even the ground itself. Leaning against a sturdy tree or resting your camera on a flat rock can provide the necessary support to minimize shake. If you find yourself near a ledge or a wall, these surfaces can serve as excellent makeshift tripods. By pressing your camera against these solid structures, you can achieve a steadier shot, especially in low-light conditions where longer exposure times are required.
In addition to using your environment, your own body can be an effective stabilizing tool. Adopting a stable stance is crucial; spread your feet shoulder-width apart and keep your elbows close to your body. This position creates a solid base, allowing you to brace your camera against your face for added stability. Furthermore, if you can find a way to sit or kneel, you can lower your center of gravity, which often results in a more stable shot. By employing these techniques, you can harness your body’s natural stability to counteract any unwanted movement.
Another innovative approach is to use a camera strap to your advantage. By looping the strap around your wrist and pulling it taut, you create a tension that can help stabilize your camera. This technique is particularly useful for handheld shots, as it allows you to maintain control while reducing the likelihood of camera shake. Additionally, if you have a belt or a sturdy bag, you can attach the strap to it, anchoring your camera and providing an extra layer of support.
Moreover, consider experimenting with different shooting techniques. For instance, using burst mode can be beneficial when you’re unsure about stability. By taking multiple shots in quick succession, you increase the chances of capturing a clear image, even if some frames are slightly blurred. This method is particularly effective in dynamic environments where wind or movement is a factor. Similarly, employing a faster shutter speed can help freeze motion, allowing you to capture crisp details without the need for a tripod.
Lastly, don’t underestimate the power of post-processing. While it’s always best to capture the perfect shot in-camera, modern editing software offers tools that can help reduce the effects of camera shake. Techniques such as image stabilization can be applied during the editing process, allowing you to salvage images that may have otherwise been discarded. This not only enhances your final product but also encourages a mindset of creativity and adaptability.
In conclusion, while a tripod can be an invaluable tool for landscape photography, its absence should not deter you from pursuing stunning shots. By creatively utilizing your environment, employing your body as a stabilizing force, and exploring innovative techniques, you can still achieve remarkable results. Embrace the challenges that come your way, and let them inspire you to think outside the box, transforming potential setbacks into opportunities for artistic expression. With a little ingenuity and a willingness to adapt, you can capture breathtaking landscapes, even when your tripod fails.
Utilizing Natural Elements for Support in Landscape Photography
When embarking on a landscape photography adventure, the anticipation of capturing breathtaking vistas often comes with the expectation of having the right equipment, including a sturdy tripod. However, there are moments when our trusty tripods fail us, whether due to unexpected damage, weight constraints during travel, or simply forgetting to pack it. In such instances, the world of landscape photography does not come to a halt; instead, it opens up a realm of creativity and resourcefulness. Utilizing natural elements for support can transform a potentially frustrating situation into an opportunity for innovation and artistic expression.
One of the most accessible solutions is to look around and identify stable surfaces that can serve as makeshift supports. Large rocks, fallen logs, or even sturdy branches can provide the necessary stability for your camera. By carefully positioning your camera on these natural elements, you can achieve a steady shot, especially in low-light conditions where longer exposure times are required. It’s essential to ensure that the surface is level and secure, as this will help maintain the composition and clarity of your image. This approach not only allows you to capture stunning landscapes but also encourages you to engage more deeply with your surroundings, fostering a connection with the environment that can enhance your photography.
In addition to using solid surfaces, consider the unique textures and shapes of the landscape itself. For instance, if you find yourself near a body of water, the shoreline can serve as an excellent vantage point. By resting your camera on a flat rock or even the ground, you can create reflections that add depth and intrigue to your photographs. Similarly, if you’re in a forested area, the natural contours of the earth can provide a stable base. Leaning your camera against a tree or using a low angle can yield dramatic perspectives that might not have been possible with a tripod. This adaptability not only helps in capturing the moment but also encourages you to explore different angles and compositions that you might have overlooked.
Moreover, the use of natural elements can extend beyond mere physical support. The landscape itself can become an integral part of your composition. Incorporating elements like overhanging branches, wildflowers, or even the play of light through leaves can enhance your photographs, adding layers of interest and context. By embracing the imperfections and spontaneity of your surroundings, you can create images that tell a story, capturing the essence of the moment rather than adhering strictly to technical perfection.
As you navigate the challenges of tripod-less photography, remember that creativity often flourishes in adversity. The absence of a tripod can push you to think outside the box, encouraging you to experiment with different techniques such as hand-holding your camera at slower shutter speeds or utilizing image stabilization features. This adaptability not only hones your skills as a photographer but also deepens your appreciation for the beauty of the natural world.
In conclusion, while a tripod can undoubtedly enhance landscape photography, the absence of one should not deter your passion for capturing stunning images. By utilizing natural elements for support and embracing the unique characteristics of your environment, you can create breathtaking landscape shots that reflect both your artistic vision and the beauty of the world around you. So, the next time you find yourself tripod-less, take a moment to explore your surroundings, and let nature inspire your creativity.
Mastering Handheld Shooting: Tips for Sharp Images
When embarking on a photography adventure, the anticipation of capturing breathtaking landscape shots often comes with the expectation of using a tripod for stability and precision. However, there are moments when a tripod may fail you—perhaps it’s forgotten at home, or the terrain is too rugged to set one up. In such instances, mastering handheld shooting becomes essential, transforming potential frustration into an opportunity for creativity and skill development. With a few techniques and a bit of practice, you can achieve sharp images that rival those taken with a tripod.
First and foremost, understanding the importance of your body as a stabilizing tool is crucial. When shooting handheld, your body can serve as a natural support system. To maximize stability, adopt a solid stance with your feet shoulder-width apart. This position not only lowers your center of gravity but also provides a sturdy base from which to shoot. Additionally, tucking your elbows close to your body can help minimize movement, creating a more stable platform for your camera. By grounding yourself in this way, you can significantly reduce the chances of camera shake, especially in low-light conditions.
Moreover, the choice of shutter speed plays a pivotal role in achieving sharp images. A general rule of thumb is to use a shutter speed that is at least equal to the reciprocal of your focal length. For instance, if you’re shooting at 100mm, aim for a shutter speed of 1/100th of a second or faster. However, if you find yourself in a situation where the light is dim, and you need to slow down your shutter speed, consider using image stabilization features available in many modern lenses and cameras. This technology can help counteract minor movements, allowing you to capture sharp images even at slower speeds.
In addition to these techniques, utilizing the camera’s settings to your advantage can make a significant difference. Increasing your ISO can help you achieve faster shutter speeds in low-light situations, but be mindful of the potential for noise in your images. Striking a balance between ISO, aperture, and shutter speed is key to maintaining image quality while ensuring sharpness. Experimenting with these settings in various lighting conditions will enhance your understanding of how they interact, ultimately leading to better handheld shots.
Another effective strategy is to engage in the practice of breathing techniques. Before pressing the shutter button, take a deep breath and exhale slowly. This simple act can help calm your body and reduce tension, allowing for a steadier hand. Additionally, consider using the camera’s burst mode to capture multiple frames in quick succession. This technique increases your chances of getting a sharp image, as even slight movements can be mitigated by the rapid succession of shots.
Finally, don’t underestimate the power of composition. When framing your shot, look for natural elements in the environment that can provide additional support. Leaning against a tree or wall can offer extra stability, while using foreground elements can help anchor your composition. By being mindful of your surroundings and incorporating these elements into your shots, you can enhance both the stability and aesthetic quality of your images.
In conclusion, while a tripod may be a photographer’s best friend, mastering handheld shooting opens up a world of possibilities. By employing techniques that enhance stability, adjusting camera settings wisely, and incorporating mindful practices, you can capture stunning landscape shots even when your tripod fails. Embrace the challenge, and let your creativity flourish as you explore the art of handheld photography.
The Importance of Composition When Tripod Support is Lacking
When embarking on a photography adventure, the tripod often serves as a reliable companion, providing stability and precision for capturing breathtaking landscape shots. However, there may come a time when this essential tool fails, whether due to a mechanical malfunction, unexpected weather conditions, or simply the need for mobility. In such moments, understanding the importance of composition becomes paramount, as it can elevate your photography even in the absence of tripod support.
Composition is the backbone of any great photograph, guiding the viewer’s eye and conveying the intended message of the image. When faced with the challenge of shooting without a tripod, it is crucial to focus on the arrangement of elements within the frame. One effective technique is to utilize the rule of thirds, which involves dividing the frame into a grid of nine equal parts. By positioning key elements along these lines or at their intersections, you can create a more dynamic and engaging composition. This method encourages a sense of balance and harmony, drawing the viewer’s attention to the focal points of your landscape.
Moreover, incorporating leading lines can significantly enhance your composition. These lines, whether they are natural features like rivers, roads, or pathways, guide the viewer’s gaze through the image, creating a sense of depth and perspective. When you find yourself without a tripod, look for these lines in your surroundings and use them to your advantage. By framing your shot to include these elements, you can create a more compelling narrative within your landscape photography, even if the stability of a tripod is absent.
In addition to leading lines, consider the foreground, middle ground, and background of your composition. A well-structured landscape photograph often includes elements in all three areas, providing a sense of depth and context. When shooting handheld, try to incorporate interesting foreground elements that can anchor the image and draw the viewer in. This could be anything from a cluster of wildflowers to a textured rock formation. By doing so, you create layers within your photograph, making it more visually appealing and immersive.
Lighting also plays a crucial role in composition, especially when tripod support is lacking. The golden hours—shortly after sunrise and before sunset—offer soft, diffused light that can enhance the colors and textures of your landscape. During these times, you can experiment with different angles and perspectives, capturing the scene in a way that highlights its natural beauty. The interplay of light and shadow can add depth to your images, making them more captivating even when shot handheld.
Finally, don’t underestimate the power of spontaneity. When you find yourself without a tripod, embrace the opportunity to explore different viewpoints and compositions. Sometimes, the most breathtaking shots come from unexpected angles or moments. Allow yourself to be inspired by your surroundings, and let your creativity flow. By focusing on composition and being adaptable, you can still capture stunning landscape photographs that resonate with viewers, even in the face of challenges.
In conclusion, while a tripod can provide stability and precision, the essence of great landscape photography lies in composition. By mastering techniques such as the rule of thirds, leading lines, and thoughtful layering, you can create compelling images that stand out, regardless of the circumstances. Embrace the challenge, and let your creativity shine through as you capture the beauty of the world around you.
Leveraging Low Light Conditions for Stunning Landscape Shots
When embarking on a photography adventure, the beauty of landscape shots often lies in the interplay of light and shadow. However, there are moments when your trusty tripod may fail you, leaving you to navigate the challenges of capturing stunning images without its support. In such situations, embracing low light conditions can transform your photography experience into something extraordinary. The magic of twilight, dawn, or even overcast days can yield breathtaking results, provided you know how to leverage these conditions effectively.
As the sun dips below the horizon, the world is bathed in a soft, ethereal glow. This is the golden hour, a time when the light is diffused and warm, creating a perfect canvas for landscape photography. While a tripod might typically be used to stabilize your camera during longer exposures, you can still achieve remarkable results by adjusting your technique. First, consider increasing your camera’s ISO setting. A higher ISO allows your camera to capture more light, enabling you to shoot at faster shutter speeds, which is essential when you’re hand-holding your camera. However, be mindful of the potential for noise; finding the right balance is key to maintaining image quality.
In addition to adjusting your ISO, you can also experiment with your aperture settings. A wider aperture not only allows more light to enter the camera but also creates a beautiful depth of field, blurring the background and drawing attention to your subject. This technique can be particularly effective in low light conditions, where the contrast between the illuminated foreground and the darker background can create a striking visual impact. As you compose your shot, look for interesting foreground elements that can add depth and context to your landscape, enhancing the overall composition.
Moreover, the use of natural elements can further enhance your low light photography. Water bodies, for instance, can reflect the soft hues of the sky, creating a mesmerizing effect. Positioning yourself near lakes, rivers, or oceans can provide opportunities to capture stunning reflections, especially during the twilight hours. The gentle ripples on the water’s surface can add an element of dynamism to your images, making them more engaging. Similarly, incorporating silhouettes of trees or mountains against a colorful sky can evoke a sense of drama and intrigue, drawing viewers into the scene.
As you navigate these low light conditions, remember that patience is your ally. The beauty of landscape photography often lies in the fleeting moments that can be easily missed. Take the time to observe your surroundings, waiting for the perfect moment when the light aligns just right. This might mean lingering a little longer as the sun sets or being ready to capture the first light of dawn. Each moment presents a unique opportunity to create something special, and being attuned to these changes can elevate your photography to new heights.
In conclusion, while a tripod may be a valuable tool in landscape photography, it is not the only means to achieve stunning results. By embracing low light conditions and adapting your techniques, you can capture breathtaking images that resonate with emotion and beauty. The world is full of opportunities waiting to be discovered, and with a little creativity and perseverance, you can transform even the most challenging situations into extraordinary photographic experiences. So, the next time your tripod fails you, remember that the magic of low light can lead to some of your most memorable shots.
Post-Processing Techniques to Enhance Handheld Landscape Photos
When you find yourself in a breathtaking landscape, the last thing you want is for your tripod to fail you. However, even without this essential piece of equipment, you can still capture stunning images that evoke the beauty of your surroundings. The key lies in mastering post-processing techniques that can elevate your handheld shots to a professional level. By understanding how to enhance your images digitally, you can transform what might initially seem like a setback into an opportunity for creativity and innovation.
To begin with, the first step in post-processing is to import your images into a software program that allows for detailed editing. Popular options include Adobe Lightroom and Photoshop, both of which offer a range of tools to refine your photos. Once your images are loaded, take a moment to assess the overall composition and exposure. Often, handheld shots may suffer from slight blurriness or misalignment, but with careful adjustments, you can salvage these moments. Start by cropping the image to improve the composition, focusing on the rule of thirds to create a more dynamic visual flow.
Next, consider adjusting the exposure and contrast. Handheld shots can sometimes result in underexposed images, especially in challenging lighting conditions. By increasing the exposure slightly, you can bring out the details hidden in the shadows. Additionally, enhancing the contrast will help to define the elements within the landscape, making the colors pop and adding depth to the image. This is particularly effective in landscapes where the interplay of light and shadow creates dramatic effects.
Color correction is another vital aspect of post-processing that can significantly enhance your handheld landscape photos. Often, the colors captured in-camera may not fully represent the vibrancy of the scene. Utilize the white balance tool to adjust the temperature and tint, ensuring that the colors appear natural and true to life. You can also enhance specific colors using the HSL (Hue, Saturation, Luminance) panel, allowing you to emphasize the greens of the foliage or the blues of the sky, creating a more captivating image.
Moreover, sharpening your image can help to counteract any softness that may have resulted from shooting without a tripod. Be cautious, however, as over-sharpening can lead to unnatural artifacts. A subtle increase in sharpness can bring out the fine details in the landscape, making textures more pronounced and inviting the viewer to explore the image further.
As you refine your photo, consider adding a vignette effect to draw attention to the center of the image. This technique subtly darkens the corners, guiding the viewer’s eye toward the focal point of your composition. It can create a sense of intimacy and focus, enhancing the overall impact of your landscape shot.
Finally, don’t shy away from experimenting with creative filters or presets that can add a unique touch to your images. Whether you prefer a moody black-and-white conversion or a vibrant, high-contrast look, these tools can help you express your artistic vision. Remember, post-processing is not just about correcting flaws; it’s an opportunity to infuse your personality into your work.
In conclusion, while a tripod may provide stability, the art of capturing breathtaking landscape shots does not solely depend on it. By embracing post-processing techniques, you can enhance your handheld photos, transforming them into stunning representations of the beauty you experienced. With practice and creativity, you can turn any photographic challenge into a chance for artistic expression, ensuring that your memories are preserved in all their glory.
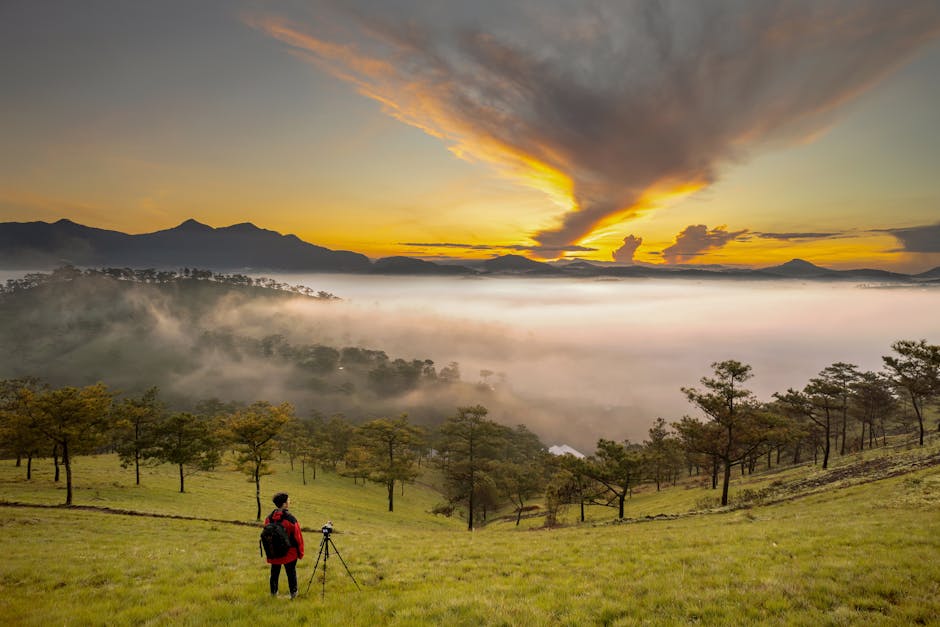
Essential Gear Alternatives to Tripods for Landscape Photography
When embarking on a landscape photography adventure, the tripod often stands as a photographer’s steadfast companion, providing stability and precision. However, there are moments when this essential piece of gear may fail us, whether due to unexpected damage, weight constraints, or simply the desire for spontaneity. In such instances, it becomes crucial to explore alternative gear that can still help capture breathtaking landscape shots. Embracing creativity and resourcefulness can lead to stunning results, even in the absence of a tripod.
One of the most accessible alternatives is the use of a sturdy backpack. When positioned correctly, a backpack can serve as a makeshift platform for your camera. By placing your camera on top of the bag and adjusting its height, you can achieve a stable shooting position. This method is particularly effective when shooting at lower angles or when you need to elevate your camera for a unique perspective. Additionally, the weight of the bag can help anchor your camera against wind, reducing the chances of unwanted movement during long exposures.
Another innovative solution is to utilize natural elements in your surroundings. Look for flat rocks, logs, or even a sturdy fence post that can provide a stable base for your camera. By carefully balancing your camera on these surfaces, you can create a solid foundation for your shots. This approach not only enhances stability but also allows you to connect with the environment, integrating the natural landscape into your composition. Furthermore, using these elements can add an organic touch to your photographs, enriching the overall aesthetic.
If you find yourself in a pinch, consider employing your body as a stabilizing tool. By bracing your arms against your body or using a wall or tree for support, you can minimize camera shake. This technique is particularly useful for handheld shots, especially when shooting at slower shutter speeds. Additionally, adopting a wide stance and bending your knees can help lower your center of gravity, providing further stability. This method encourages a more intimate connection with your surroundings, allowing you to immerse yourself in the moment while capturing the beauty around you.
For those who are willing to invest in alternative gear, a monopod can be an excellent substitute for a tripod. Lightweight and portable, a monopod offers a balance between stability and mobility. It allows for quick adjustments and is particularly useful in dynamic environments where you may need to move frequently. With a monopod, you can still achieve sharp images while enjoying the freedom to explore various angles and compositions without the bulk of a traditional tripod.
Moreover, consider using a remote shutter release or the camera’s self-timer function to further reduce the risk of camera shake. By eliminating the need to physically press the shutter button, you can ensure that your images remain crisp and clear, even when shooting handheld. This small adjustment can make a significant difference, especially in low-light conditions or when capturing long exposures.
Ultimately, the key to capturing breathtaking landscape shots lies in adaptability and creativity. While a tripod may be the traditional choice, exploring alternative gear can lead to unexpected and inspiring results. By embracing the environment around you and utilizing the resources at hand, you can create stunning images that reflect not only the beauty of the landscape but also your unique perspective as a photographer. So, the next time your tripod fails, remember that the world is full of possibilities waiting to be captured.
Q&A
1. Question: What should you do if your tripod fails while shooting landscapes?
Answer: Look for stable surfaces like rocks, benches, or the ground to rest your camera on.
2. Question: How can you stabilize your camera without a tripod?
Answer: Use your body as a stabilizer by bracing your elbows against your torso and holding the camera close.
3. Question: What settings can help reduce camera shake in landscape photography?
Answer: Use a faster shutter speed and increase your ISO if necessary to maintain exposure.
4. Question: Are there any techniques to improve stability while hand-holding the camera?
Answer: Use the “squeeze” technique by gently squeezing the shutter button to minimize movement.
5. Question: How can you utilize natural elements for stabilization?
Answer: Lean against a tree, wall, or other sturdy objects to provide additional support.
6. Question: What composition tips can help when shooting without a tripod?
Answer: Focus on simpler compositions that require less precision and avoid complex foreground elements.
7. Question: Is it advisable to use image stabilization features on your camera or lens?
Answer: Yes, enabling image stabilization can help reduce the effects of camera shake when shooting handheld.
Conclusion
In conclusion, capturing breathtaking landscape shots without a tripod requires adaptability and creativity. Utilizing stable surfaces, employing faster shutter speeds, and leveraging techniques such as bracing against solid objects or using your body for stabilization can help achieve sharp images. Additionally, experimenting with composition and post-processing can enhance the final result, ensuring that even in the absence of a tripod, stunning landscapes can still be effectively captured.
composition natural elements post-processing low light conditions handheld shooting
Leave a Reply